
Key takeaways
- A powder film of 60–80 µm needs a dry, conversion-coated surface; a 5 µm oil film left after degreasing will blister the coating at cure temperature.
- Rinse quality matters as much as chemistry: carry-over of 1% of tank 1 drag-out into tank 2 can halve the conversion coating's corrosion performance.
- Powder cures on part metal temperature, not oven air temperature — a 200 °C oven can leave a 10 mm bracket at 160 °C and under-cured.
- Ask for DFT on five points per part and a cross-hatch adhesion result per batch; a visual pass alone will not show a 40 µm thin edge.
Most coating failures that reach a warranty claim did not start in the powder booth. They started in tank one, when a part went in with drawing oil still on the surface, or in tank six, when the final rinse carried dissolved salts back onto a freshly converted surface. The seven-tank pretreatment process explained properly is not a list of stages — it is a list of failures, each one assigned to a tank.
The number that ties the stages together is film thickness. A polyester powder film of 60–80 µm is roughly 120–160 times thicker than the 0.5 µm conversion coating under it, and it still relies on that conversion layer for adhesion and on the rinse quality for corrosion resistance. Get the tanks right and the coating lasts the service life of the enclosure. Get one wrong and the film peels in sheets, usually after the first monsoon.
Seven-tank pretreatment process explained: what each tank prevents
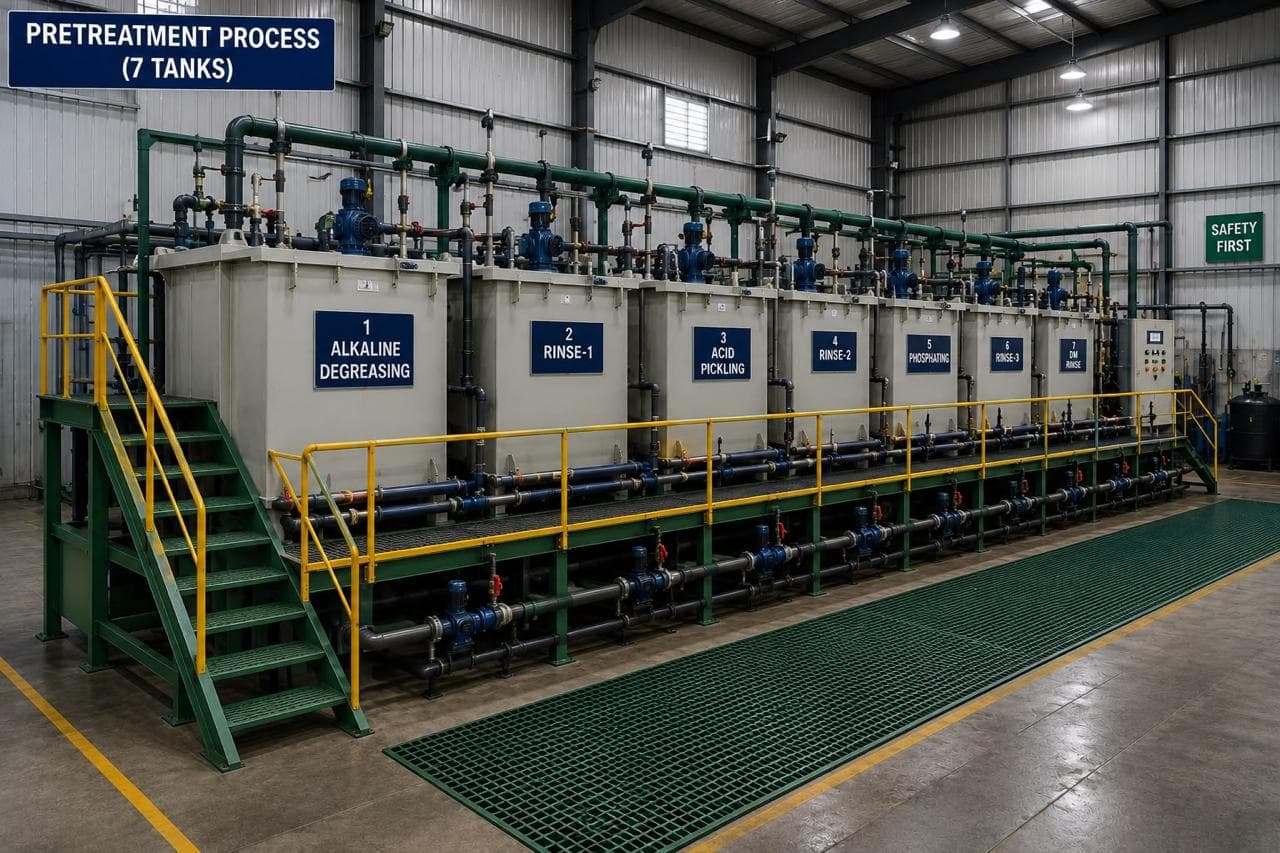
The sequence runs degrease, rinse, activate, convert, rinse, final rinse, dry. Each stage exists because skipping it produces a specific defect that shows up weeks or months later, not on the line.
Tank 1 — degrease. Removes drawing oil, cutting fluid, handling grease and shop dust. If 5 µm of oil survives, the alkaline cleaner cannot wet the steel and the conversion coating forms patchily or not at all. At powder cure, the trapped oil volatilises under the film and produces a blister or a pinhole. This is the single most common cause of a coating that looks perfect at dispatch and fails in the field.
Tank 2 — rinse. Stops the cleaner from being carried into the next chemistry. An alkaline film left on the surface neutralises the conversion bath locally and produces a streaky, low-weight coating.
Tank 3 — activation. Conditions the surface so the conversion crystals nucleate evenly. Without it, the conversion coating is coarse and uneven, and adhesion varies across the part.
Tank 4 — conversion coating. Builds the thin crystalline layer that the powder bonds to and that slows corrosion at a scratch. Coating weight is the number to control here, not the colour of the part.
Tank 5 and 6 — rinse and final rinse. Remove the conversion chemistry and, critically, the dissolved salts. This is where a part can be ruined after doing everything else right. Final rinse should be demineralised water; tap water leaves a mineral film that shows as a white bloom under the powder and as a corrosion site later.
Tank 7 — dry-off. Removes the water before powder application. Moisture trapped under a powder film flashes to steam during cure and lifts the coating.
The values a coating drawing should carry
A finish callout of "powder coated" is not a specification. The drawing needs the substrate, the pretreatment system, the powder type, the film thickness range, the cure condition, the colour standard and the test method for adhesion. Everything else is left to the supplier's default, and the default is the cheapest route that passes a visual check.
| Parameter | Typical requirement | Ganesh limit or note |
|---|---|---|
| Pretreatment stages | 7-tank with demineralised final rinse | Seven-tank line, in-house |
| Substrate | CRCA, HR, galvanised, aluminium | Mild steel, CRCA, stainless, aluminium, brass, copper fabricated in-house |
| Powder type | Polyester, indoor or outdoor grade | Electrostatic powder booth, 18 ft × 14 ft |
| Dry film thickness | 60–80 µm | Measured with DFT gauge |
| Minimum DFT on cut edge | 40 µm | Edge coverage reviewed on first article |
| Adhesion test | Cross-hatch, ASTM D3359 Method B | Cross-hatch adhesion testing in-house |
| Cure | Part metal temperature per powder datasheet | Curing oven; part temperature verified on thick sections |
| Salt spray | ISO 9227 NSS to the hours in the drawing | Third-party test where the drawing requires it |
| Colour | RAL or customer standard under agreed illuminant | Visual against approved panel |
The film thickness range deserves a note of its own. Below 50 µm, a laser-cut edge or a weld toe may carry less than 30 µm and will show rust first. Above roughly 120 µm, the film becomes brittle: it chips on impact and can crack along a bend radius that was coated after forming. The 60–80 µm band is wide enough to cover part geometry variation and narrow enough to keep the film flexible.
The four failures the tanks are meant to stop
Coating defects are diagnosed by where they appear and what they look like, and each pattern points back to a stage.
Blistering after cure. Solvent or moisture trapped under the film. Look at tank 1 for residual oil and tank 7 for incomplete dry-off. A blister that appears within 24 hours of cure is almost always a dry-off or contamination problem, not a powder problem.
Adhesion loss in a patch. Conversion coating missing or too light in that area. Look at tank 3 and tank 4: activation chemistry out of range, bath temperature low, or immersion time short on a part with a deep return flange that traps air.
Rust at edges and weld toes first. Film too thin at the geometry, or the edge was never coated because the powder could not wrap into it. This is a design-and-application issue as much as a chemistry one, and it is the failure mode covered in why powder coating fails on outdoor enclosures.
White bloom under a clear or light-coloured film. A rinse problem. It is cosmetic at first and becomes a corrosion site later.
Hanging, drainage and the marks the jig leaves
The tank sequence is only half the process. The other half is how the part hangs, because every jig contact point is an uncoated spot and every horizontal face is a place where chemistry or rinse water sits.
A part that traps liquid in a closed channel or a deep return will carry contaminated rinse water into the next tank on every cycle. That is not a bath problem; it is a hanging problem. Rotate the part so the deepest feature drains, and if the geometry cannot drain, add a small drain hole at the design stage — a 6 mm hole in the lowest point of a box section costs nothing on the drawing and removes a permanent source of carry-over.
Jig marks are the visible cost. A part hung from a 4 mm contact point has a bare patch roughly 8–10 mm across after coating, and it must be placed where the customer will accept it: inside a face, on a mounting surface that bolts down, or on an edge that will be trimmed. Agree the jig mark location on the drawing rather than after the first batch, because relocating a jig on a running part usually means a fixture change.
Shadowing is the third issue. Powder is applied electrostatically and wraps around edges well, but a deep recess or the inside of a 90° return receives less than a flat face. If a coating requirement applies inside a recess, say so, and expect the first article to be checked there specifically.
Substrate changes the bath, not the sequence
Aluminium needs a different route through the same line. Its oxide layer forms within minutes of cleaning, so the conversion stage has to suit aluminium chemistry, and an alkaline cleaner left too long on an aluminium part etches the surface and produces a smut that blocks adhesion. Galvanised steel has the opposite problem: the zinc surface reacts with the cleaner and can produce a white corrosion product if the rinse is weak, which is why the degreasing stage needs its own bath control for each substrate rather than one setting for the whole shop.
Salt spray, and what it does not tell you
When a drawing calls for salt spray to ISO 9227, the neutral salt spray test gives a hours-to-red-rust number on a prepared panel. It is a comparative test, not a life prediction: 480 hours of NSS does not mean four years of coastal service, and a part that passes on a flat panel can fail at a sheared edge because the test panel had no edge.
Treat the salt spray number as a screening test for the coating system. If two powder suppliers offer the same resin at the same film thickness, the NSS result separates them. If the part geometry has sharp edges, deep returns or weld spatter, the salt spray panel tells you nothing about those features — first article inspection on the actual part does.
Ganesh tests dry film thickness and cross-hatch adhesion in-house, and where a drawing requires salt spray evidence, the test is specified at quotation so it is priced and scheduled rather than discovered at dispatch.
How Ganesh Multitech runs pretreatment and coating
The seven-tank line at Ganesh runs ahead of an 18 ft × 14 ft electrostatic powder booth, with a separate wet paint booth and a curing oven. Parts from the laser, the press shop and the weld cells go through the same pretreatment sequence, which is what makes a coated assembly consistent when it contains a pressed bracket, a laser-cut panel and a welded frame.
Upstream of the tanks, the 16 ft × 16 ft shot blast chamber removes scale and weld discolouration on heavier fabrications, and the whole route sits inside the paint shop capability. The surface treatment and coating hub holds the associated articles on adhesion, cure and outdoor failure. DFM review happens before the part reaches the line: a design with a 3 mm gap between two flanges cannot be coated properly at 70 µm, because the powder cannot wrap into a gap narrower than twice the film thickness.
The seven-tank pretreatment post walks the stages in physical order, tank by tank, including immersion times and part hanging. This article is the specification side: what to put on the drawing, what to measure, and which stage to question when a defect appears.
What the finish specification has to settle
- Substrate and its standard, with the surface condition before coating.
- Pretreatment system required, or the service environment that determines it.
- Powder type, grade and colour reference under a named illuminant.
- DFT range, plus a separate minimum at edges and weld toes.
- Adhesion test method and acceptance level.
- Cure condition, expressed as part metal temperature and time.
- Masked areas: threads, earth points, mating faces, hinge bores.
- Any salt spray or accelerated test requirement, with hours and standard.
The powder coating cost estimator shows how film thickness, part size and masking drive the per-part cost, which is useful when a drawing's 100 µm callout is being defended against a 70 µm alternative.
When powder coating is the wrong finish
Powder is the wrong choice when the part will be handled heavily during assembly, because a 70 µm film chips at impact and a touch-up pen never matches. It is also wrong for a part with deep, narrow cavities where the gun cannot reach, and for a substrate that will move after coating — a film that survives a 2 mm deflection will crack at 5 mm.
For those parts, a wet paint system or a plated finish may be the better route, and the design review should say so rather than forcing powder onto geometry it cannot cover.
Send the drawing with substrate, environment, colour and any standard the finish must meet. The engineering team will return the pretreatment route, the DFT target, the masking plan and the inspection record, with the assumptions visible enough to challenge.
Frequently asked questions
What are the seven tanks in pretreatment?
Degrease, rinse, activation or second clean, conversion coating, rinse, final rinse, and dry-off. Exact chemistry follows the approved plant process and the substrate; the sequence exists to remove oil, remove the cleaning residue, build a conversion layer and dry it before powder.
How thick should powder coating be on a sheet metal part?
60–80 µm dry film thickness is the working range for a polyester powder on CRCA for indoor and sheltered outdoor service. Below 50 µm the cut edges and weld throats lose coverage; above 120 µm the film can crack on impact and at bend radii.
Does the number of tanks guarantee corrosion resistance?
No. Seven stages give the process enough separation to rinse properly between chemistries, but corrosion performance depends on bath control, rinses, conversion coating weight, cure and the substrate. The tank count is the method, not the result.
Can you coat over laser-cut edges without deburring?
A laser cut leaves a narrow oxide-affected edge that takes powder poorly. A light deburr or a brush on a visible edge improves coverage; heavy dross on 6 mm and above should be removed before pretreatment, because no coating will bridge it.
Sources
Need a coating specification checked?
Send the drawing with substrate, service environment, colour and any standard the finish must meet. We return the pretreatment route, the film thickness target and the inspection evidence.
Request a coating quote